Automated testing is one of those things that is wonderful to have, but setting up functionality that goes beyond checking that something happened in your own system can require time-consuming custom solutions. There is no current and reliable way to intercept these Webhook responses in your test suite, and you shouldn’t be hitting API endpoints every time you run your automated tests as it is. Additionally, Webhook responses from Stripe contain a signing secret that needs to be mocked or bypassed. So, how do we solve these problems that are inherent to the Stripe Webhook ecosystem and actually test against mocked responses?
If you want to save yourself the pain of having to manually test your Webhook responses coming from Stripe, look no further! We’ve all been down that road at least once and seen it as an exercise in futility and tedium first-hand, so let’s avoid the frustration and heartbreak completely.
We will be utilizing rspec-rails, VCR, and the Stripe SDK for Ruby. Be sure to add them to your Gemfile and run bundle install . You can add vcr and rspec-rails under the group :test block if you’d like.
# Gemfile
gem 'rspec-rails'
gem 'vcr'
gem 'stripe'

Understanding
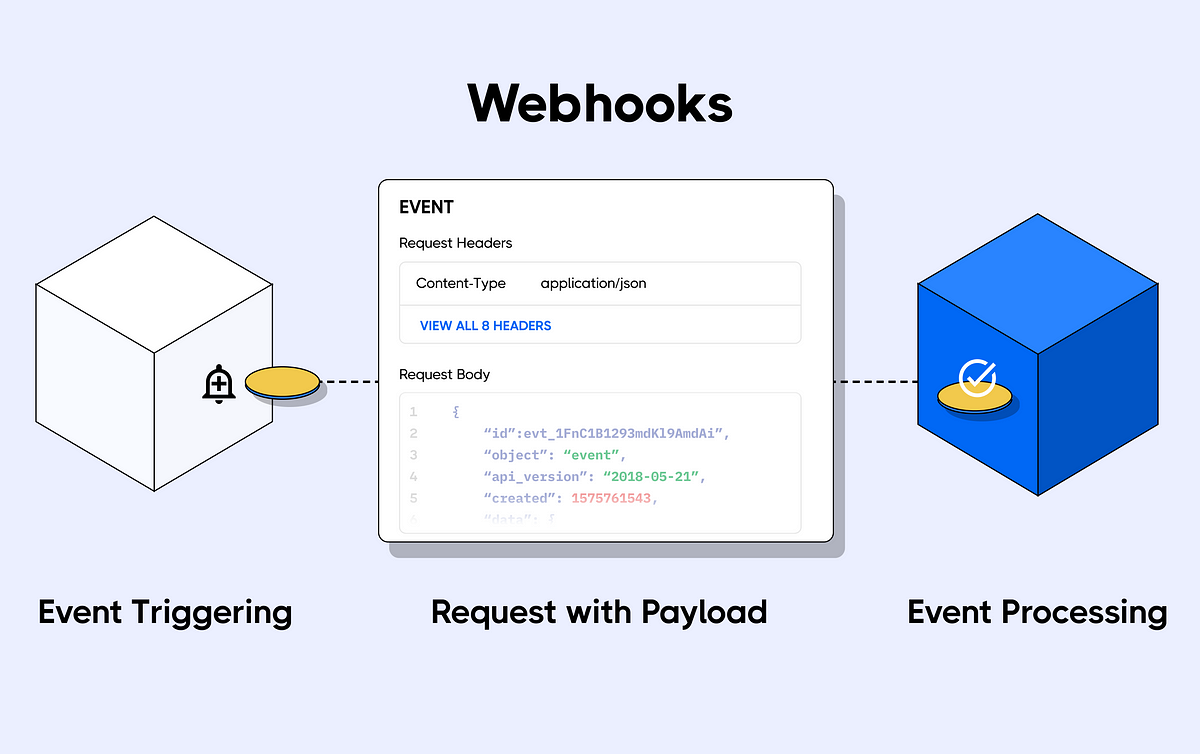
Most webhooks return something similar to what you’d expect from a standard GET request. Stripe does something like this, but a problem arises when you go to check the response: the actual data object you need to access is buried deeper in the response object.
If we were to create a Customer, this is what the Webhook request would look like on our server:
{
  :id => "evt_XXXXXXXXXXXXXXXXXXXX",
  :object => "event",
  :api_version => "2022-11-15",
  :created => 1687939884,
  :data => {
    :object => {
      :id => "cus_XXXXXXXXXXXXX",
      :object => "customer",
      :address => nil,
      :balance => 0,
      :created => 1687939884,
      :currency => nil,
      :default_source => nil,
      :delinquent => false,
      :description => "(created by Stripe CLI)",
      :discount => nil,
      :email => nil,
      :invoice_prefix => "205F6C4C",
      :invoice_settings => {
        :custom_fields => nil,
        :default_payment_method => nil,
        :footer => nil,
        :rendering_options => nil
      },
      :livemode => false,
      :metadata => {},
      :name => nil,
      :next_invoice_sequence => 1,
      :phone => nil,
      :preferred_locales => [],
      :shipping => nil,
      :tax_exempt => "none",
      :test_clock => nil
    }
  },
  :livemode => false,
  :pending_webhooks => 1,
  :request => {
    :id => "req_XXXXXXXXXXXX",
    :idempotency_key => "XXXXXXX-XXXX-XXXX-XXXX-XXXXXXXXXXX"
  },
  :type => "customer.created"
}
As you can see, the customer data is wedged in there under response[:data][:object] . This is mostly what we care about, but attaining a completely mocked response can be important if you need to test that other data is processed correctly from the webhook outside of the customer object. We might as well make it as close to a one-to-one mock as possible, right?
This is easily achievable in a mostly automated way with creative usage of the VCR library. VCR allows you to record an HTTP request once and have it saved in a formatted YML file to ‘replay’ later when making the same request (to the same URL) without having to make the API call again in your test suite. Handy!
Essentially what we will be doing is creating a Customer in our test suite once using the Stripe API, then insert the correct data into a response object to be consumed by the Webhook endpoint on your server. Then, we hit your webhook endpoint with the data so you can test it using POST requests.
If it sounds simple, thats because it is.
VCR Setup
Assuming you have Stripe configured correctly with your keys set up and secured, let’s start with the basics.
First, we need to set up VCR. You’ll need to configure it and set a cassette directory. You can do this by adding this code to your rails_helper.rb file:
# spec/rails_helper.rb
VCR.configure do |config|
  config.cassette_library_dir = "#{::Rails.root}/spec/cassettes"
  config.ignore_localhost = true
  config.configure_rspec_metadata!
end
This is a fairly standard setup, but you may need to add or remove options. config.configure_rspec_metadata! is an interesting one, but not applicable to this tutorial. If you want more information, look here. I’ll be explicitly naming VCR files for clarity.
If you haven’t already, you will need to set up a webhook route/endpoint. This can easily be done using Stripe Event Gem. This greatly simplifies the process of setting up the endpoints and the complimentary service and delegation objects you’ll need to process the data. They suggest you use Service objects, so you do you when it comes to interfaces. If you already have a webhook route and controller set up for Stripe, you are good to go.
I decided to put the logic to create my Customers into a service object that’s delegated through my controller webhook action based on the Stripe event received, so I will be writing tests with that context in mind. You will need to set up a simple test file with some starter code in it:
# spec/requests/stripe_events_spec.rb

require 'rails_helper'

RSpec.describe "StripeEvents", type: :request do

  def bypass_event_signature(payload)
    @event = Stripe::Event.construct_from(JSON.parse(payload, symbolize_names: true))
    expect(Stripe::Webhook).to receive(:construct_event).and_return(@event)
  end

end
The method bypass_event_signature is going to make it so you don’t have to submit a request signature. This is vitally important, as we don’t want to have to validate against a live request signature in local tests.
You can set the request headers in the rspec test later and submit the event signature if you like (or your controllers require it/validate for it), but the bypass method is the simplest solution and works out-of-the-box with Stripe Event Gem. The only difference would be constructing the correct headers based on your Stripe webhook secret or whatever you are using to validate the requests instead of using the bypass method if you really want to go that route. I have a distinct memory of this being tumultuous, as there are a few different headers with Stripe-specific values that need to be generated in the correct contexts on Stripe’s side that are time-based in some implementations, so don’t say I didn’t warn you. You can learn more here.
We will feed it a payload later once we set up some more tooling.
Next, you’ll need to set up a VCR request to construct the basis of the webhook response. We use a response directly from Stripe, because it’s hard to tell how their request structure might change in the future. If you want to upgrade API versions later, you don’t want to have to manually change the VCR files or paste in mock data. That sounds like too much work and a nightmare to maintain. You can just delete the applicable VCR YML file and run the test file once, and it’ll record the new response. This will also allow you to keep your tests atomic so they can be run independently and limit hair-pulling when upgrading. This can be done with this setup:
# spec/requests/stripe_events_spec.rb

require 'rails_helper'

RSpec.describe "StripeEvents", type: :request do

  def bypass_event_signature(payload)
    @event = Stripe::Event.construct_from(JSON.parse(payload, symbolize_names: true))
    expect(Stripe::Webhook).to receive(:construct_event).and_return(@event)
  end

  ### Fancy new VCR response mocking!
  before(:all) do
    VCR.use_cassette("stripe_create_customer") do
      Stripe::Customer.create({name: "Tester One", description: "Test customer", email: "test@testers.com"})
    end
    VCR.eject_cassette
  end

end
It is worth noting that I am calling the Stripe SDK directly here, because all I care about is that the VCR file has a single Customer object in its response for this test case. If you use a service to do this, or have hooks/callbacks on your User model or something, you’ll need to use your own implementation of creating a Customer.
We want to check that VCR is recording the API call that the Stripe gem is making. We will sandbox it before implementing the actual tests just to be sure:
# spec/requests/stripe_events_spec.rb

require 'rails_helper'

RSpec.describe "StripeEvents", type: :request do

  def bypass_event_signature(payload)
    @event = Stripe::Event.construct_from(JSON.parse(payload, symbolize_names: true))
    expect(Stripe::Webhook).to receive(:construct_event).and_return(@event)
  end

  before(:all) do
    VCR.use_cassette("stripe_create_customer") do
      Stripe::Customer.create({name: "Tester One", description: "Test customer", email: "test@testers.com"})
    end
    VCR.eject_cassette
  end

  ### Our sandbox to initialize the VCR cassette
  describe "sandbox" do
    it "will sandbox" do
      puts "Just run the test, please"
    end
  end
end
You should notice a new file under spec/cassettes/stripe_create_customer.yml. This is the baseline request that was mentioned earlier. If you run the tests again (or multiple times), and check the Stripe dashboard, you’ll notice that only one Customer was created. Thank you, VCR!
Mocking the Response
Next up is the utility to help mock the response object coming from Stripe in your webhooks. I decided to put it into a helper, as mocking it was simple enough. It could be amended and fed other top-level data if the need arose later or have its sources delegated with another strategy. KISS for the moment, you know?
You will want to create a test helper file and add this to it:
# spec/support/helpers/stripe_helpers.rb

require 'yaml'
require 'json'

module StripeHelpers
  def self.construct_webhook_request(vcr_file_name, event_name)
    current_time = Time.now.to_i
    pulled_data = YAML.load_stream(File.read("spec/cassettes/#{vcr_file_name}.yml"))
    body = JSON.parse(pulled_data[0]['http_interactions'][0]['response']['body']['string'])
    body["created"] = current_time

    request_body = {
      "id": "evt_XXXXXXXXXXXXXXXXXX",
      "object": "event",
      "api_version": "2022-11-15",
      "created": current_time,
      "data": {
        "object": body
      },
      "livemode": false,
      "pending_webhooks": 2,
      "request": {
        "id": "req_XXXXXXXXXXXX",
        "idempotency_key": "XXXXXXX-XXXX-XXXX-XXXX-XXXXXXXXXXXXX"
      },
      "type": event_name
    }
    return request_body
  end
end
With this helper, we have set up the scaffolding to ensure that we can mock responses as accurately as possible. Essentially, we have created a method that takes the name of the VCR file in the vcr_file_name argument to retrieve the mocked Customer data and create the object that we wish to see under the webhook request’s data[:object] . We set the timestamp to be current_time in case we need to run it against async workers that are run on a schedule. We also set it up to take an event_name so we can use this in multiple contexts.
Remember to replace the filler X values with your own data if you want a more accurate representation!
Ideally, you will need to replace the id , request["id”]and request["idempotency_key"]with something you get back from Stripe itself. This can be done by creating a Customer and logging the result in your Webhook controller and simply replacing the data manually — you should only have to do this once for this type of implementation. The Stripe CLI is very handy for these scenarios and I would highly recommend checking it out.
You’ll also need to make sure that this file is loaded into your test suite. Add this to the require area of your rails_helper.rb :
# spec/rails_helper.rb

require './spec/support/helpers/stripe_helpers'
Now it’s time to put it all together.
Testing It Out
We will now write a simple test to ensure that your webhook is returning a 200 success response. Stripe expects this as a part of their request lifecycle, so it’s not a bad place to start.
This can now be executed simply using the code we have constructed. The finished product should look something like this:
# spec/requests/stripe_events_spec.rb

require 'rails_helper'

RSpec.describe "StripeEvents", type: :request do

  def bypass_event_signature(payload)
    @event = Stripe::Event.construct_from(JSON.parse(payload, symbolize_names: true))
    expect(Stripe::Webhook).to receive(:construct_event).and_return(@event)
  end

  before(:all) do
    VCR.use_cassette("stripe_create_customer") do
      Stripe::Customer.create({name: "Tester One", description: "Test customer", email: "test@testers.com"})
    end
    VCR.eject_cassette
  end

  # No longer a sandbox! We have an actionable HTTP Status test now.
  describe "customer events" do
    it "will return a 200 if successful" do
      @request_body = StripeHelpers.construct_webhook_response("stripe_create_customer", "customer.created")
      bypass_event_signature(@request_body.to_json)
      post(stripe_event_url, params: @request_body)
      expect(response).to have_http_status(:success)
    end
  end
end
Notice that we are passing the name of the cassette as well as the event_type to StripeHelpers.construct_webhook_response . This gives us back a Ruby hash that we then submit as parameters to our webhook endpoint.
Thats it! You should be able to mock webhook responses using this technique. This is relatively basic and lacks advanced tooling or any real convention outside of giving basic arguments to utility methods, so be sure to consider the needs of your codebase before blindly copy-pasting this in.